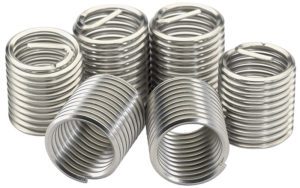
As its name suggests, a HeliCoil is a helically coiled stainless steel wire that has a diamond-shaped cross-section.
The wire cross-section allows the external portion of the wire to screw into the receiving threads in the housing during installation.
On the inner portion of the wire, the spacing between the coils of the insert form new conventional 60° threads.
The coils of the insert are compressed during installation as the insert is threaded into the housing.
Like a coiled spring, the compressed windings of the installed insert attempt to expand against the walls of the threaded housing. The resulting tension between the insert and the walls of the housing helps to retain the insert and keep it from unthreading.
The insert is provided with a drive tang that is used during installation to thread the insert into the receiving threads in the housing. A special installation tool engages the tang of the insert to drive it into the housing. Once installed, the tang is no longer needed, and is removed.
A small notch is formed into the insert that slightly reduces the coil cross sectional area at that location. When the time comes to remove the tang, the notch will cause it to break-off at that point.
Installation Procedure:
Drill out the old threads using the drill size that is recommended on the thread repair kit packaging. The shank of the tap also lists the recommended drill size.
2. Tap the hole using the Screw Thread Insert (STI) tap.
3. Install the insert using the installation tool.
For coarse-pitch threads, use the following procedure:
Slide the insert onto the installation tool.
Rotate the insert until the tang contacts the driver notch of the installation tool.
Screw the insert into the STI threaded hole to the proper depth using a tap handle to rotate the installation tool.
After the insert is seated to the proper depth, unthread the installation tool.
For fine-pitch threads, use the following procedure:
Use the pre-coil body supplied in the thread repair kit. The pre-coiler helps to compress the threads of the insert prior to installation in the housing.
Slide the insert into the pre-coil body.
Rotate the installation tool to thread it through the insert until the notch in the tool contacts the tang of the insert.
Continue rotating the installation tool to wind the insert into the threaded end of the pre-coil body.
Using one hand, hold the pre-coil body squarely against the surface of the workpiece over the tapped hole. Rotate the installation tool to drive the insert through the pre-coil body and into the tapped hole in the housing. As the insert is installed, be sure to allow the pre-coil body to float as needed to allow the windings of the HeliCoil to align with the threads in the housing.
After the insert is seated to the proper depth, unthread the installation tool.
Repair Tip:
One of the reasons that HeliCoils fail in service is that they are improperly installed initially.
A good rule-of-thumb is to install the HeliCoil so that the top of the insert is 1/4 to 1/2 turn below the top surface of the workpiece. One easy way to determine the installed depth is detailed below…
Before beginning the HeliCoil installation process, look closely at the STI threads cut in the hole. Notice the location where the STI thread first starts to enter the hole.
Make a small temporary reference mark on the surface of the housing that is rotated 3/4 turn from the location where the STI thread first enters the hole. This mark is used determine the installed depth of the insert.
Install the insert using the process previously described, and screw the HeliCoil into the housing until the (non-tang) end of the insert is rotationally aligned with the temporary reference mark. Following this process, the top of the insert is installed 1/4 turn below the top surface of the housing.
If a deeper seating of the insert is desired, rotate the installation tool up to 1/4 additional turn.
4. Remove the tang of the insert.
Use a punch or a piece of round bar stock that fits snugly into the inside diameter of the installed insert.
The end of the punch or bar should have a square end (without a chamfer).
Allow the bar or punch to rest against the tang of the insert, and hold it squarely in the hole.
Strike the end of the tool with a sharp tap with a hammer. The tang should break-off at the notch in the insert that is designed for that purpose. On larger diameter inserts, it is sometimes easier to use a pair of needle-nose pliers to twist-off the tang.
Recover the tang from the housing prior to re-assembling the machine.