Call Us: +91-7410524141
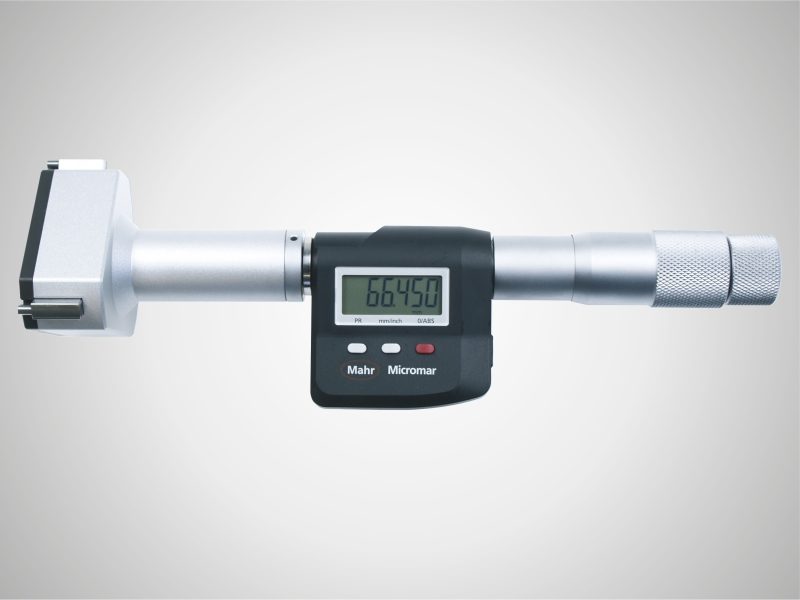
MICROMAR 44 EWR – SELF-CENTERING DIGITAL INSIDE MICROMETERS
MICROMAR 44 EWR DIGITAL SELF-CENTERING INSIDE MICROMETER Threaded connection for changing the measuring head Self-centering measuring head consists of 3 laterally positioned anvils, each are offset at intervals of 120° Anvils from 12 mm are carbide tipped From 12 mm the anvils can be used to measure the bottom of a bore From 40 mmMICROMAR 44 EWR DIGITAL SELF-CENTERING INSIDE MICROMETER
- Threaded connection for changing the measuring head
- Self-centering measuring head consists of 3 laterally positioned anvils, each are offset at intervals of 120°
- Anvils from 12 mm are carbide tipped
- From 12 mm the anvils can be used to measure the bottom of a bore
- From 40 mm all measuring heads are made from aluminium to reduce weight
- Digimatic
- Opto RS232C
- USB
- Battery life approx. 2 years
- IP 52
- basic units 44 EWg
- measuring head 44 Ak
- instruction manual
- batter
- case
- 8.5 mm
 |
|||||||
| |
|
|
|
|
|
||
Technical data
| Order no. | Measuring range mm | Measuring range inches | Resolution mm/inch | Error limit µm | Notes error limit |
|---|---|---|---|---|---|
| 4191120 |
6 – 8
|
.25 – .3125″
|
0.001 / .00005″
|
4 µm
|
over the full length of the anvils
|
| 4191121 |
8 – 10
|
.3125 – .4″
|
0.001 / .00005″
|
4 µm
|
over the full length of the anvils
|
| 4191122 |
10 – 12
|
.4 – .4725″
|
0.001 / .00005″
|
4 µm
|
over the full length of the anvils
|
| 4191123 |
12 – 16
|
.4725 – .625″
|
0.001 / .00005″
|
4 µm
|
over the full length of the anvils
|
| 4191124 |
16 – 20
|
.625 – .775″
|
0.001 / .00005″
|
4 µm
|
over the full length of the anvils
|
| 4191125 |
20 – 25
|
.775 – 1″
|
0.001 / .00005″
|
4 µm
|
over the full length of the anvils
|
| 4191126 |
25 – 30
|
1 – 1.2″
|
0.001 / .00005″
|
4 µm
|
over the full length of the anvils
|
| 4191127 |
30 – 40
|
1.2 – 1.6″
|
0.001 / .00005″
|
4 µm
|
over the full length of the anvils
|
| 4191129 |
40 – 50
|
1.6 – 2″
|
0.001 / .00005″
|
4 µm
|
over the full length of the anvils
|
| 4191130 |
50 – 60
|
2 – 2.35″
|
0.001 / .00005″
|
5 µm
|
over the full length of the anvils
|
| 4191131 |
60 – 70
|
2.35 – 2.75″
|
0.001 / .00005″
|
5 µm
|
over the full length of the anvils
|
| 4191032 |
70 – 85
|
2.75 – 3.35″
|
0.001 / .00005″
|
5 µm
|
over the full length of the anvils
|
| 4191033 |
85 – 100
|
3.35 – 4″
|
0.001 / .00005″
|
5 µm
|
over the full length of the anvils
|
| 4191034 |
100 – 125
|
4 – 4.9″
|
0.001 / .00005″
|
6 µm
|
over the full length of the anvils
|
| 4191035 |
125 – 150
|
4.9 – 5.9″
|
0.001 / .00005″
|
6 µm
|
over the full length of the anvils
|
| 4191036 |
150 – 175
|
5.9 – 6.9″
|
0.001 / .00005″
|
7 µm
|
over the full length of the anvils
|
| 4191037 |
175 – 200
|
6.9 – 7.9″
|
0.001 / .00005″
|
7 µm
|
over the full length of the anvils
|
Functions
- RESET (set display to zero)
- ABS (display can be set to zero without losing reference to preset)
- mm/inch
- PRESET (for entering a numerical value)
- DATA (data transmission via connection cable)
- LOCK function (key lock)
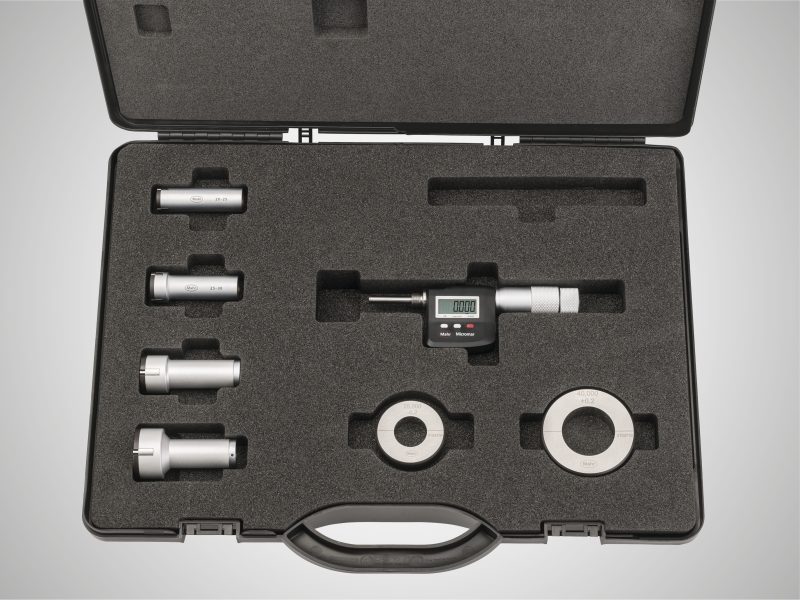
MICROMAR 44 EWR DIGITAL SELF-CENTERING INSIDE MICROMETER SETS
- Threaded connection for changing the measuring head
- Self-centering measuring head consists of 3 laterally positioned anvils, each are offset at intervals of 120°
- Anvils from 12 mm are carbide tipped
- From 12 mm the anvils can be used to measure the bottom of a bore
- From 40 mm all measuring heads are made from aluminium to reduce weight
- Digimatic
- Opto RS232C
- USB
- Battery life approx. 2 years
- IP 52
- basic units 44 EWg
- measuring heads 44 Ak
- setting rings
- battery
- instruction manual
- case
- 8.5 mm
 |
|||||||
| |
|
|
|
|
|
||
Technical data
| Order no. | Measuring range mm | Measuring range inches | Resolution mm/inch | Error limit µm | Notes error limit |
|---|---|---|---|---|---|
| 4191160 |
6 – 12
|
.25 – .4725″
|
0.001 / .00005″
|
4 µm
|
over the full length of the anvils
|
| 4191161 |
12 – 20
|
.4725 – .775″
|
0.001 / .00005″
|
4 µm
|
over the full length of the anvils
|
| 4191162 |
20 – 50
|
.775 – 2″
|
0.001 / .00005″
|
4 µm
|
over the full length of the anvils
|
| 4191163 |
50 – 100
|
2 – 4″
|
0.001 / .00005″
|
5 µm
|
over the full length of the anvils
|
Functions
- RESET (set display to zero)
- ABS (display can be set to zero without losing reference to preset)
- PRESET (for entering a numerical value)
- mm/inch
- LOCK function (key lock)
- DATA (data transmission via connection cable)


